Saturday, 27 May 2017
Baseboard Construction
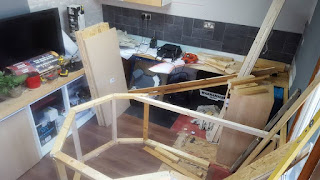
A full Saturday building the next few levels up. Second level is complete accept for the lift out sections at the door.
I have also build the Top main baseboard framing. I will leave the boards off until i get the track laid below, to leave myself good access.
Friday, 26 May 2017
Lewis Lake Track Plan Level 1, 2 & 3
Having left St. Leonard Yard on the bottom level, 3 turns of the Helix brings you to this Run around level, this is just to add running length to the Trains. The Train comes off and past the door, rising the last 75mm (3inch) to meet the Helix at the next level. This reduces the need for points.
On this level we have the main line running through the middle of 2 Long Storage sidings. As i have no off layout Storage i needed to create as much as possible on the layout without it looking. So from these siding you head back onto the Helix to Head up.
I am Planning to have the layout looking like its build within the Mountains, With Lewis Lake in Yellowstone park, i feel i can achieve this. The Second level is again a single run around to add length. The level will sneak in and out of the mountains, with a few Tunnels and Bridges.and back on to the helix to reach the final level.
This will be the main switching level, and will be operated by standing, and in some peoples case standing on a box..... I plan for at least three Industries on this level, as you come off the Helix you pass West Loanhead Coal Mine, which will be built off the Mountain side. Moving Round to Caledonian Distillery (My Grandfather worked in this Distillery in Edinburgh for over 40 years) plus who does not like a beer. As you move around to sit above the Roundhouse and Helix, East Roslin Steel & Wire Works will be the main Industry here, I plan to have this sitting on a Dock front with a Ship on the quayside. I hope to add another Industry in this Area, but i want to see how much room the steelworks up, and what space i have left, Following the Back road onto the Helix and coming all the way down on the inside to the St. Leonard Yard on the bottom level, complete the loop.
I feel with the space i have this was the best use of it and will give me room to have trains running and Switching options.
I think 3 people would be able to operated ok and have space to move about and be able to sit, we could have 4 but one would need to be in the Helix.
As is pay day i have managed to pick up some timber, so hope to have the a load more base boards built over the weekend
Wednesday, 24 May 2017
Lewis Lake - Base Level Track Plan
It took some working out, but i seem to have managed it.
Here is my track plan for the base level of Lewis Lakes, I drew it out using AutoCAD and managed to covert it into a picture so i can post it here. I managed to find Scale Drawings of all Peco Code 83 points, so i reproduced then as CAD blocks that i could use in the Track Design. Using AutoCAD also allowed my to Design the Helix and the curves to achieve the correct radius.
This is the base level of the Layout and the Start of my Trains Journey. Trains will be built up in St Leonard Yard, with the ladder tracks holding my Rolling stock and cabooses. There is Space to build 2no. 20 car trains here, which can the be taken around the layout on the outside line and stored in the two Holding lines at the back of the yard, which can only be accessed from the outside line. As the Train leaves the yard it will pass my Workbench and onto the Helix running up the Outside line to the Industries that are on the very top level.
When i am running a operating session, of which i have room for 3 people, (4 is someone want to switch the Steelworks) Each person will be allocated a Shed number form the round house, the loco in the stall will be theirs to operated for the day. then give a Card Switch list to go and build there Train from the bottom yard, each car will the have a destination to be delivered. This is how i hope it works anyway. two Operators are able to work the bottom yard, with the other working the Steelworks or one of the other Industries on the top deck. There is also the scope if i am working away in the shed, to just switch a train on and let it run around.
When i designed the layout i wanted space for a little Switching and have a few friends over to operated, but also just be able to let the locos run. I wanted to do my best to fit a Large Turntable in and as big a round house is possible. Due to the limited space i have, I had to drop the round house board down, so i could sneak it under the Helix. When looking at it, the Sheds will look like they have been build into the side of the mountain, but i was will to accept this.
When running up the Helix, you have no option but to come off at each level and run around the shed, this saved me from having any points in the Helix and adds running length to the trains. When you reach top the helix runs from top to bottom and you finish up at the top of the yard, ready to switch you train around.
There is no much space for Builds and Structures on this level as i wanted to have as much Storage space as possible for my Rolling stock. At the top of the yard there will be a small Platform/Loading Dock and there will be a few other structures dotted about.
Monday, 22 May 2017
HO Helix Construction
I managed to get the Helix to full Height at the weekend, I have all my on and off tracks in place, except for the top level, but i will have to build the main Baseboards below first.
I have also moved the TV over a bit to allow for better viewing.
Sunday, 21 May 2017
Lewis Lake Railroad - Finished Helix
Helix Finished and working, Time to build the main Baseboards
Friday, 19 May 2017
Helix Design and Building
Helix Design
I have a minimum radius of 26 Inchs on my layout, so i made sure this followed into the helix.
I used AutoCAD a computer drafting package to aid with the Design of the curves and the templates. for the Supports i used 12mm threaded rod, i would have preferred to have used 10mm, but the company i work for had 12mm laying around so i was not going to complain.
The Bed is made from 12mm chipboard which is cheap and strong enough to span the gap. The bed is 175mm (7inch) wide.
The reason i used screwed rod was the ease to adjust the height of the bed at each level, by just turning the nuts. And it does drive you nuts screwing down each one to the correct level from the top. I worked out turning them in pairs was the best way, as the bottom one clamped the board in place and the second became the support for the one above.
I started by building the first turn and setting out the rod points by widening the board where the rods would be fixed, so as not to affect the clearance of the loco and rolling stock. I used the first turn as a template for the next six levels, and it has worked very well.
Once the first turn was in i laid the track and added droppers for power, I solider each length of Flexi track once in place. Once i have full tested the complete helix i plan to use white glue watered down to complete the fixing, then add a few cuts to allow for expansion
This pictures show the entrance ramp from the yard onto the Helix, the back line is a run around, to allow access to the back of the yard, and the holding sidings.
The Rods are about 2 inches longer than they need to be, so will be cut down where needed
On the third loop the track comes off for a run around with two large sidings to hold Loco's, you can just see the off track on the right hand side. This track comes back on at the fourth loop, so i need to make the 75mm height different up before i get to the Helix
The outside track is my Up track to take me to each level, coming on and off where needed, You can not go from the bottom to the top on the outside track is it forces you to come off at each level. The inside line comes from the top all the way down to the bottom into the yard. This took away the need for any points on the helix, there is also no way two trains can meet going opposite directions, so should help greatly with operation.
This is how my Helix stands just now. I have a loop and a half until its finished and i will have reached my top level.
The last picture on the Left shows where you come off the Helix into the Yard, the Wifes soup tins come in very handy.
I am very pleased with the progress so far and have to thank David Ross for the help with the Design and setting up.
This weekend should see the Helix finished so will update again on Monday
I have a minimum radius of 26 Inchs on my layout, so i made sure this followed into the helix.
I used AutoCAD a computer drafting package to aid with the Design of the curves and the templates. for the Supports i used 12mm threaded rod, i would have preferred to have used 10mm, but the company i work for had 12mm laying around so i was not going to complain.
The Bed is made from 12mm chipboard which is cheap and strong enough to span the gap. The bed is 175mm (7inch) wide.
The reason i used screwed rod was the ease to adjust the height of the bed at each level, by just turning the nuts. And it does drive you nuts screwing down each one to the correct level from the top. I worked out turning them in pairs was the best way, as the bottom one clamped the board in place and the second became the support for the one above.
I started by building the first turn and setting out the rod points by widening the board where the rods would be fixed, so as not to affect the clearance of the loco and rolling stock. I used the first turn as a template for the next six levels, and it has worked very well.
Once the first turn was in i laid the track and added droppers for power, I solider each length of Flexi track once in place. Once i have full tested the complete helix i plan to use white glue watered down to complete the fixing, then add a few cuts to allow for expansion
This pictures show the entrance ramp from the yard onto the Helix, the back line is a run around, to allow access to the back of the yard, and the holding sidings.
The Rods are about 2 inches longer than they need to be, so will be cut down where needed
On the third loop the track comes off for a run around with two large sidings to hold Loco's, you can just see the off track on the right hand side. This track comes back on at the fourth loop, so i need to make the 75mm height different up before i get to the Helix
The outside track is my Up track to take me to each level, coming on and off where needed, You can not go from the bottom to the top on the outside track is it forces you to come off at each level. The inside line comes from the top all the way down to the bottom into the yard. This took away the need for any points on the helix, there is also no way two trains can meet going opposite directions, so should help greatly with operation.
This is how my Helix stands just now. I have a loop and a half until its finished and i will have reached my top level.
The last picture on the Left shows where you come off the Helix into the Yard, the Wifes soup tins come in very handy.
I am very pleased with the progress so far and have to thank David Ross for the help with the Design and setting up.
This weekend should see the Helix finished so will update again on Monday
Tuesday, 9 May 2017
Baseboard Construction, Helix Design
I have ripped all the old units out and the table in the middle, and the place is looking real bare
I have now installed my new workbench below my window. The lowest track level you can see runs across here, with a small spur for a Programming track.
The wall on the left will hold my St. Leonard Yard there will be two holding tracks, the main and 4 yard tracks. The Baseboards at the back take my lines off the Helix onto the yard.
This is the framing for the Roundhouse and turntable, which is 150mm lower than the yard to the left. Each segment will have shelving and storage.
Once this Area is boarded out i will be able to start the Helix
Tuesday, 2 May 2017
New Track plan
New Track Plan
Its fair to say i change my mind alot, worse then a woman i have heard before.
So with that in mind, I have stopped all my On30 Layout Building took all my stuff and Sold it to Mac's Models, for a very good price.
As mentioned before i have a 4m x 3.5m Shed in the Back garden, which i have full power lighting and heating, after what seemed like an all to easy chat with my wife, i was given full permission to built a Static layout in there so i can play trains.
Over the past year i have been planning my New HO American layout, by drawing it up in AutoCAD.
The main things i wanted was:-
Long Runs
Roudhouse and turntable.
Mountians
And a little switching
Which i am please to say i have managed to get all in and a little extra.
The layout will have a Helix in one corner and 4 running levels around the shed.
Level 1, will have a yard the full length of the back wall allowing for the biggest train i plan to run (Big Boy and 20 boxcars) to be stored. I will also have my Roundhouse and turn table at this level , the round house sneaking under the Helix.
Level 2 will be a run around to add running length, this will sit about 5 inches above the main yard and will hug the wall.
Level 3 will also be a run around the will sit about 6 inches below the top finished level, this i plan to snake in and out, with the Track running along a river edge, disappearing in and out of tunnels.
Level 4 will be my top level and will hold all my industries, So far i plan to have a Distillery, Steelworks and a Coal Mine, this will allow me to take the rolling stock from the yard at the bottom level and do a little switching.
I have also designed the track plan to allow for trains just to run, when i am not wanting to operate.
So the Construction work begins :-)
Subscribe to:
Posts (Atom)